
DIY Hot Air Balloon for Kid's Room or Party
A few weeks ago, we were on a walk here in BK and I saw this hanging from the ceiling at an upscale children's store (I think it's called Dumbo, on Atlantic Ave, for locals).

I know the picture is awesome; I was afraid to take a photo inside the store itself, so I took it from the window. In any case, isn't that balloon charming? I don't remember how much it is, but I believe about $100. I figured I could do my own version for our little lady pretty cheaply - if not nearly as beautifully or intricately as whoever made this.
I was pretty sure I wasn't the first person to think of a hot air balloon for a kid's room, so I checked out Pinterest. Surprise! The blogosphere is all over this. People are so crafty. They've made hot air balloons from actual balloons, decorative party poufs, paper mache, string and starch (!), light bulbs (!!) and what I'd been intending to use, paper lanterns. My favorite paper lantern one is this one from Crafts Unleashed.
Wanna make one?
Gather these supplies:

This stuff is pretty self-explanatory: A paper lantern (mine was about $3 from the party section at Target), a small basket ($1 at Goodwill), twine (about $1 at Target) and any decorative elements. I had some scrap paper and ribbon I thought I'd incorporate. You'll also need glue. I used both craft glue and my hot glue gun, and I was happier with the latter.
Take these steps:
Assembly was pretty easy. I assembled the lantern, and then knotted together 4 lengths of twine around the center top metal frame of the lantern, to create 8 lengths total. I considered creating the netting from the inspiration balloon (and Crafts Unleashed did a nice job of an approximation), but in the end decided that just running the string over the lantern was the right time investment to result ratio. I ran the twine down the length of the lantern in equal installments, dabbing a spot of glue on each lantern rib to hold it in place. My basket was loosely-woven enough that I could just thread my twine through the top and tie a bow to hold it. To avoid tangles, I hung it up from my shower curtain rod using an S hook while I worked. Then I cut triangles from my scrap paper and glued them on wherever I felt like. (This is where the hot glue really came in handy).


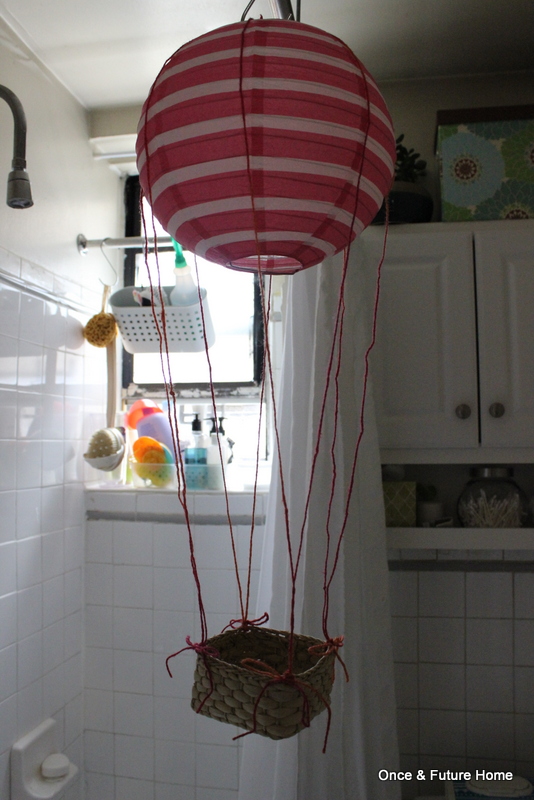
Then it was just a matter of hanging it up. I used clear fishing wire looped through the top metal bracket, and we played with locales, starting with the window and in front of a painting of the sea, but landing on above Lou's doll house. You can also see in the last picture, below, that I ended up shortening the distance between the below and the basket. It's all about authenticity, y'all.


Some resident pandas (Bret brings them back from China when he travels for work) are taking a sweet journey. It's actually kinda hilarious: the butcher, the baker...and the PRC guard? Oh, and the balloon is hanging from a command hook we stuck to the ceiling. When we hung it from the curtain rod above the window, I used a small S hook.
And that's it! For less than $5, we have a little hot air balloon which Lou loves. No, it's not as lovely as the original inspiration. And I'm humbled by some of the projects I saw on the interwebs. But it is a sweet addition to a toy nook Lou already loves. She (with our help) has been switching out who gets to ride in the balloon daily.
Tell me about low-cost projects your little ones are loving. We're always up for a 'ject over here. And pay no attention to the little glimpses you're getting of Lou's room: all in good time. Thanks for reading!