Why hello there! It is much later than I intended to post, and all I can say is because Christmas. We've been up to our elbows in Christmas cookies, so much so that I reconsidered, out loud, making them next year. Lou sadly responded that would mean the people wouldn't be happy when they got our cookies in the mail - which is a pretty killer argument - so probably we'll do it all again. But more on that at a later date. For now - the kitchen.
When last we spoke, we'd done a lot to make the kitchen work for us, including repurposing a dresser we had into more counter space, and organizing the crap out of it. But still, we were left feeling a bit bleak, and we realized that, despite our organizing efforts, we were still short on some storage for food, especially counter food, like fruit, and some assorted paraphernalia.
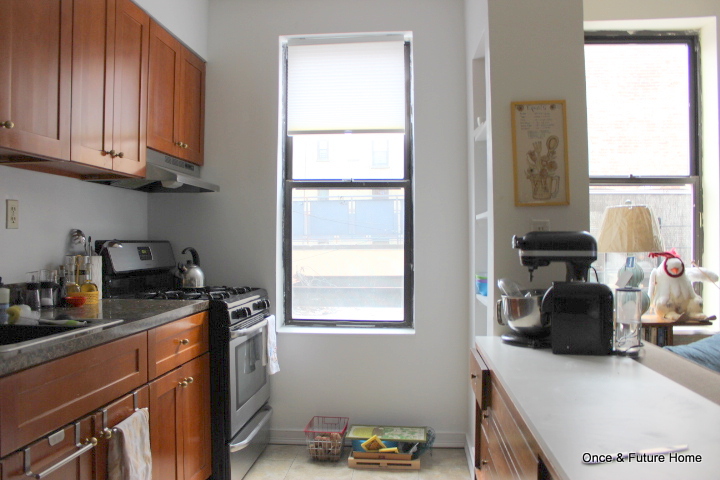
Things I'm glad you can see in this kitchen "before" shot: than knife, my less than spotless counters, the still-wrapped lamp in the family room and the next door neighbor's patio (not really). Also my skiing pengin. (Really I love that guy).
So the to do list, if I recall, had these items on it:
- Install some sort of privacy shade.
- Find a place for all the stuff without a home, including that stuff on the floor. I'm talking to you, potatoes.
- Find low baskets to store lesser-used gear underneath the dresser/island.
- Bring in a rug and hang up the art.
So here's how we did:

A kitchen with a place for everything. Yep, those are Christmas cookies cooling.
1. Window treatments. We installed a privacy valance pretty quickly. In fact, if you scroll up to the before picture, you'll see that it's there. You'll also see that it looks ridiculous. It's too small! Bret installed it and then asked me what I thought - which was that it was too narrow for our window. But he centered it on the window so it does actually block the view from the construction crew next door, it's easy to open and shut, and it was cheap. I figured we could keep it, but I needed to cover it up with something up top. A valance! I turned to these funky hand towels from Anthropologie, which I've had for years.

Turn cute dish towels into a cheap and whimsical window valance. Just fold in half and hang from curtain rod using drapery clips. Use two side by side if necessary.
A note on Anthro hand towels: They are adorable, and begging to be rupurposed into art and curtains and pillows. They also cost more than $20 a pop, which is INSANE - unless it's a wedding gift. So I wait until they are an extra 50% off clearance. I think these ended up at $4 each). Anyway, now our privacy shade (function) can hide out under our valance (form) when not in use.
2. Find a place for all the stuff. I did this in a few ways. First, I hung up my treasured teal fruit basket, for which I have a thing because it is very useful and sports my exact favorite shade of teal. All the food on the floor went in there. Second, I mounted a small shelf (from Ikea's Molger line, but I don't think they have it anymore) above the counter between the sink and the stove. It gets the cooking clutter of salt and pepper and oils out of the way so we can put our gigantic (Ikea Lamplig) cutting board, (Ginsu) knife block and (thrifted)utensil holder there. The whole zone is now really useful. I'm a fan of leaving out big cutting boards for easy prep, but it's doubly nice here, because it covers up some of the hideous granite-themed laminate. I don't even like real granite; the laminate really doesn't do it for me.

A narrow wall-mounted shelf saves critical counter space.
3. Baskets. Relatedly, I brought in some storage by finding the perfect baskets for under the dresser island. After rejecting some pricey online options and not being to find matching sets at Marshall's, I found these gray guys at Burlington Coat Factory for $10 each on clearance. They are so big! They fit a ton of baking gear and transport gear (the obligatory cupcake tote. What, you don't have one of those?), but they're shallow enough to fit perfectly.

If you're short on space, don't overlook the floor under pieces of furniture. These baskets hold a lot of stuff.
4. Art and rug. And finally, you'll see I put a little rug in there - originally for the hallway, but perfect in the kitchen - and hung up the kitchy kitchen art of which I am so fond (thrifted all, except the turquoise and navy print above the dresser, which is actually a handkerchief that belonged to my dad's mom).
So that's the kitchen, which is pretty much, officially, done. I still have to work on appliance purgatory in the entry, but with all this stuff, and one more organization sweep of the cabinets that seemed really necessary at midnight a couple days ago, everything feels really functional. Sweet.
Now, back to cookies! See you guys tomorrow.